Quick Answer: To upload files to SharePoint Online using PowerShell and Microsoft Graph API, create an Azure Entra App Registration with Sites.Selected application permissions, grant write access to your target site via Graph Explorer or PowerShell, generate a client secret, acquire an OAuth 2.0 token using Invoke-RestMethod, create an upload session at /sites/{siteId}/drives/{driveId}/root:/{folder}/{filename}:/createUploadSession, and PUT the file byte stream to the session URL.
If you’re managing files in SharePoint and want to automate uploads, you are in the right place. upload files to SharePoint Online with PowerShell, Whether you’re building automated scripts, scheduling reports, or handling migrations, using the Microsoft Graph API with PowerShell is one of the most flexible and modern ways to do this.
In this guide, I’ll walk you through a detailed, real-world way to upload files to a SharePoint document library securely using Graph API and a registered Azure AD app. This is something I use across many of my client projects and internal automation tasks.
What You’ll Need
Before we get started, make sure you have the following:
An active Microsoft 365 tenant
Global Admin or Application Admin rights in Azure AD
A SharePoint site where you want to upload the file
PowerShell with PnP.PowerShell module installed
Register an App in Azure AD
This section covers on how to Register Azure AD App for SharePoint Graph API Access; to interact with Graph API securely, we need to register an app in Azure AD:
Navigate to Azure Active Directory → App registrations → New registration
Name it something like Sharepoint_AT and Register it
Once done, copy the Application (client) ID and Directory (tenant) ID, you’ll need both later.
Assign Graph API Permissions
Now give the app the ability to talk to SharePoint:
Under the same app, go to API permissions → Add a permission
Select Microsoft Graph → Application permissions
Search for Sites.ReadWrite.All and add
Click Grant admin consent for your org
This permission ensures the app has access only to SharePoint sites you explicitly grant access to, ensuring least-privilege security.
Permission for specific site
Now to only add permission on a specific SharePoint site, proceed as below:
1. Go to API permissions and click on Add a permission
2. Select SharePoint
3. Now, select Application permissions
6. Check Sites.Selected , Sites.FullControl.All and click on Add Permission
7. Click on Grant admin consent and done
Granting SharePoint Site Access via Graph Explorer
Once you’ve added the sites.selected graph api permission to your app registration, the app doesn’t automatically get access to any SharePoint sites. You need to explicitly grant access to the specific site you want to work with.
Here’s how to do it using Microsoft Graph Explorer, step-by-step
Step-by-Step: Grant write Access to a Specific SharePoint Site
Now, We need the sharepointsiteid to apply the permission
In, Graph Explorer, select get SharePoint site based on relative path of the site under SharePoint sites option
In place of {host-name} provide your SharePoint domain address and in place of {server-relative-path} provide your site address like in the below. https://graph.microsoft.com/v1.0/sites/tenantname.sharepoint.com:/sites/yoursitename
You can get the tenantname and sitename from your site like below
Now, use the info and run the query to get the SiteId like below. Copy the second full guid(blackBox) under ID
Now, Change the HTTP method (top-left dropdown) to POST
In the Request URL, paste the following (replace the placeholder with your SharePoint site ID:
Boom, now all completed so we can use PowerShell script to Automate the file upload to SharePoint
Generate a Client Secret
If you want to use a secret proceed as below:
1. Go to Azure portal
2. Go to your Azure app which you created
3. Click on Certificates & secrets
4. Click on New client secret
5. Create your secret and save it securely
Upload content to SharePoint using GraphAPI PowerShell
To connect to your SharePoint site using the Azure AD application and upload files securely with Microsoft Graph API, you’ll need the following:
The SharePoint site URL (where the file will be uploaded)
The Azure app Client ID (from App Registration)
The Azure app secret (or certificate thumbprint if you’re using a cert-based auth)
The file path to the document you want to upload
Here’s the PowerShell script that makes it all work: This script works for uploading all the files which are under the folder. Also, The script will check if the files re already uploaded then it will skip it!
This is the main part: uploading a file using Graph API.
POWERSHELL • Upload-FilesToSharePoint.ps1
Param (
    $Tenant                  = "your-tenant-name",
    $ClientID                = "your-app-client-id",
    $Secret                  = "your-client-secret",
    $SharePoint_SiteID       = "your-site-id",
    $SharePoint_Path         = "https://yourtenant.sharepoint.com/sites/YourSite/Shared%20Documents",
    $SharePoint_ExportFolder = "Uploads",
    $LocalFolder             = "$env:USERPROFILE\OneDrive - CompanyRecordings"
)

Function Write_Log {
    param($Message_Type, $Message)
    $MyDate = "[{0:MM/dd/yy} {0:HH:mm:ss}]" -f (Get-Date)
    Write-Host "$MyDate - $Message_Type : $Message"
}

# 1. Authenticate to Microsoft Graph via OAuth 2.0
$Body = @{
    client_id     = $ClientID
    client_secret = $Secret
    scope         = "https://graph.microsoft.com/.default"
    grant_type    = 'client_credentials'
}

Write_Log INFO "Connecting to Microsoft Graph API..."
$Graph_Url = "https://login.microsoftonline.com/$Tenant.onmicrosoft.com/oauth2/v2.0/token"

Try {
    $AuthorizationRequest = Invoke-RestMethod -Uri $Graph_Url -Method Post -Body $Body
    Write_Log SUCCESS "Connected to Microsoft Graph successfully."
} Catch {
    Write_Log ERROR "Authentication to SharePoint failed: $_"
    Exit 1
}

$Access_token = $AuthorizationRequest.access_token
$Header = @{
    Authorization  = "Bearer $Access_token"
    "Content-Type" = "application/json"
}

# 2. Locate the SharePoint Document Library Drive ID
$SharePoint_Graph_URL = "https://graph.microsoft.com/v1.0/sites/$SharePoint_SiteID/drives"
Write_Log INFO "Retrieving SharePoint drive information..."

Try {
    $Result = Invoke-RestMethod -Uri $SharePoint_Graph_URL -Method GET -Headers $Header
    Write_Log SUCCESS "Retrieved SharePoint site and drive info."
} Catch {
    Write_Log ERROR "Failed to retrieve SharePoint drives: $_"
    Exit 1
}

$DriveID = $Result.value | Where-Object { $_.webURL -eq $SharePoint_Path } | Select-Object -ExpandProperty id

# 3. Enumerate Local Files and Upload to SharePoint
$files = Get-ChildItem -Path $LocalFolder -File
Write_Log INFO "Found $($files.Count) files in '$LocalFolder'"

foreach ($f in $files) {
    $File_Path = $f.FullName
    $FileName  = $f.Name

    Write_Log INFO "Checking: $FileName"

    # Check if file already exists
    $checkUrl = "https://graph.microsoft.com/v1.0/sites/${SharePoint_SiteID}/drives/${DriveID}/root:/${SharePoint_ExportFolder}/${FileName}"
    try {
        Invoke-RestMethod -Uri $checkUrl -Method GET -Headers $Header -ErrorAction Stop
        Write_Log INFO "Skipping '$FileName' - already uploaded."
        continue
    } catch {
        # 404 indicates file does not exist, proceed with upload
        if ($_.Exception.Response.StatusCode.Value__ -ne 404) {
            Write_Log ERROR "Error verifying '$FileName': $_"
            continue
        }
    }

    Write_Log INFO "Creating upload session for: $FileName"
    $createUploadSessionUri = "https://graph.microsoft.com/v1.0/sites/${SharePoint_SiteID}/drives/${DriveID}/root:/${SharePoint_ExportFolder}/${FileName}:/createUploadSession"
    Try {
        $uploadSession = Invoke-RestMethod -Uri $createUploadSessionUri -Method POST -Headers $Header -ContentType "application/json"
        Write_Log SUCCESS "Upload session created for $FileName"
    } Catch {
        Write_Log ERROR "Failed to create upload session for $FileName: $_"
        continue
    }

    # Read file bytes and stream to upload session
    $fileInBytes = [System.IO.File]::ReadAllBytes($File_Path)
    $fileLength  = $fileInBytes.Length
    $headers = @{
        'Content-Range' = "bytes 0-$($fileLength-1)/$fileLength"
    }

    Write_Log INFO "Uploading $FileName ($([math]::Round($fileLength / 1MB, 2)) MB)..."
    Try {
        Invoke-RestMethod -Method Put -Uri $uploadSession.uploadUrl -Body $fileInBytes -Headers $headers
        Write_Log SUCCESS "Successfully uploaded $FileName"
    } Catch {
        Write_Log ERROR "Failed to upload $FileName: $_"
    }
}

Write_Log SUCCESS "All file uploads completed."
Next Steps in Production
This method is incredibly powerful and secure when you’re working across different tenants or automating data flows into SharePoint.
A few closing thoughts:
Rotate secrets regularly and use Azure Key Vault for storing secrets securely
You can easily convert this to use certificates instead of secrets for extra security
Always test with test data before touching production libraries
🛡️ Bonus Tip: Automate Microsoft Teams Recordings to SharePoint
If you’re using Microsoft Teams for meetings and recordings, one common problem is that those recordings expire or get deleted after a certain retention period. By combining Graph API with PowerShell or Logic Apps, you can automatically move or copy Teams recordings to a dedicated SharePoint document library.
This not only prevents accidental deletion but also ensures that all recordings are retained for compliance, training, or auditing purposes. If you’d like a step-by-step guide on that, let me know and I’ll publish a full blog soon!
If you want help building reusable modules or Logic Apps around this, connect with us on me a line on TechEuc.com or if you are facing any issues, you can comment or would need this implemented then you can check out my freelance profile too.
This method is incredibly powerful and secure when you’re working across different tenants or automating data flows into SharePoint.
A few closing thoughts:
Rotate secrets regularly and use Azure Key Vault for storing secrets securely
You can easily convert this to use certificates instead of secrets for extra security
Always test with test data before touching production libraries
If you want help building reusable modules or Logic Apps around this, connect with us on me a line on TechEuc.com
FIVERR PRO VERIFIED12+ YRS EXPERIENCE
Atoofa Shaikh
Senior Microsoft 365, EUC & Cloud Endpoint Architect
Need custom Win32 App Packaging, PowerShell Automation, Zero-Touch Intune Autopilot, or SCCM Co-Management for your enterprise or MSP? I specialize in production-grade deployment architectures with zero downtime.

How to Upload Files to SharePoint Online Using Microsoft Graph API and PowerShell
Table of content
Quick Answer: To upload files to SharePoint Online using PowerShell and Microsoft Graph API, create an Azure Entra App Registration with
Sites.Selectedapplication permissions, grant write access to your target site via Graph Explorer or PowerShell, generate a client secret, acquire an OAuth 2.0 token usingInvoke-RestMethod, create an upload session at/sites/{siteId}/drives/{driveId}/root:/{folder}/{filename}:/createUploadSession, and PUT the file byte stream to the session URL.If you’re managing files in SharePoint and want to automate uploads, you are in the right place. upload files to SharePoint Online with PowerShell, Whether you’re building automated scripts, scheduling reports, or handling migrations, using the Microsoft Graph API with PowerShell is one of the most flexible and modern ways to do this.
In this guide, I’ll walk you through a detailed, real-world way to upload files to a SharePoint document library securely using Graph API and a registered Azure AD app. This is something I use across many of my client projects and internal automation tasks.
What You’ll Need
Before we get started, make sure you have the following:
An active Microsoft 365 tenant
Global Admin or Application Admin rights in Azure AD
A SharePoint site where you want to upload the file
PowerShell with PnP.PowerShell module installed
Register an App in Azure AD
This section covers on how to Register Azure AD App for SharePoint Graph API Access; to interact with Graph API securely, we need to register an app in Azure AD:
Go to Azure Portal
Navigate to Azure Active Directory → App registrations → New registration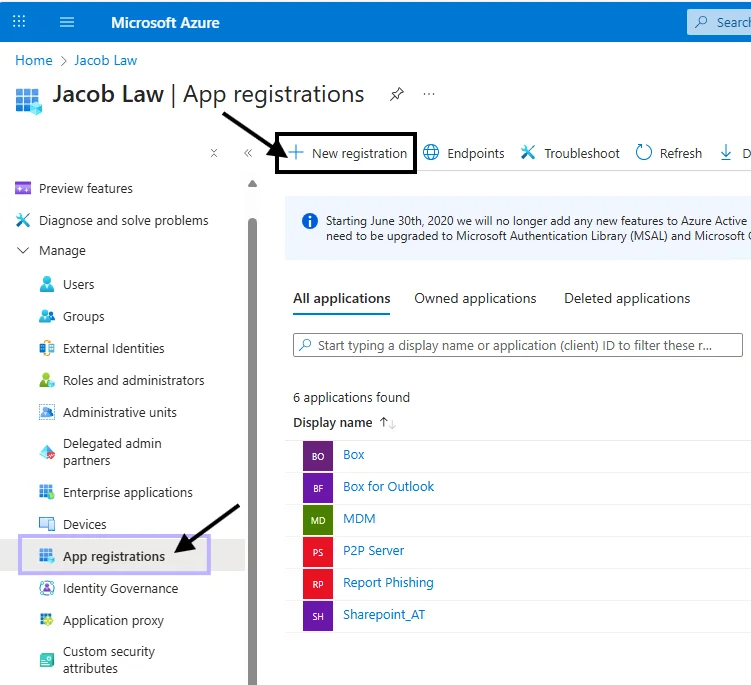
Name it something like Sharepoint_AT and Register it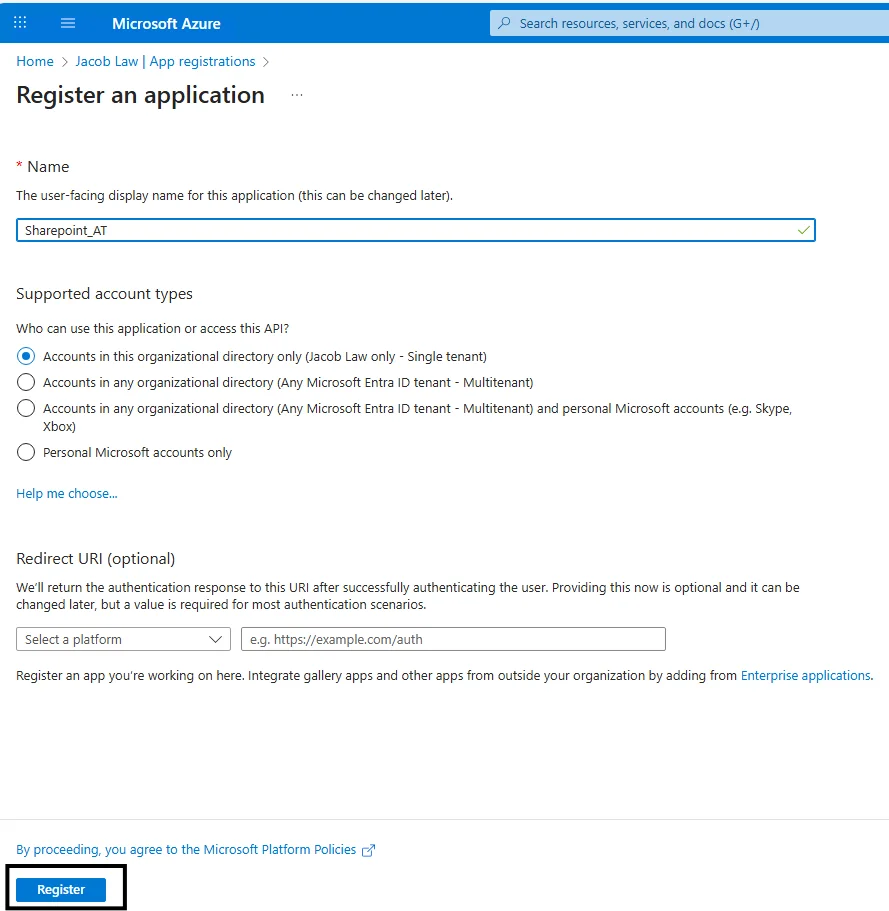
Once done, copy the Application (client) ID and Directory (tenant) ID, you’ll need both later.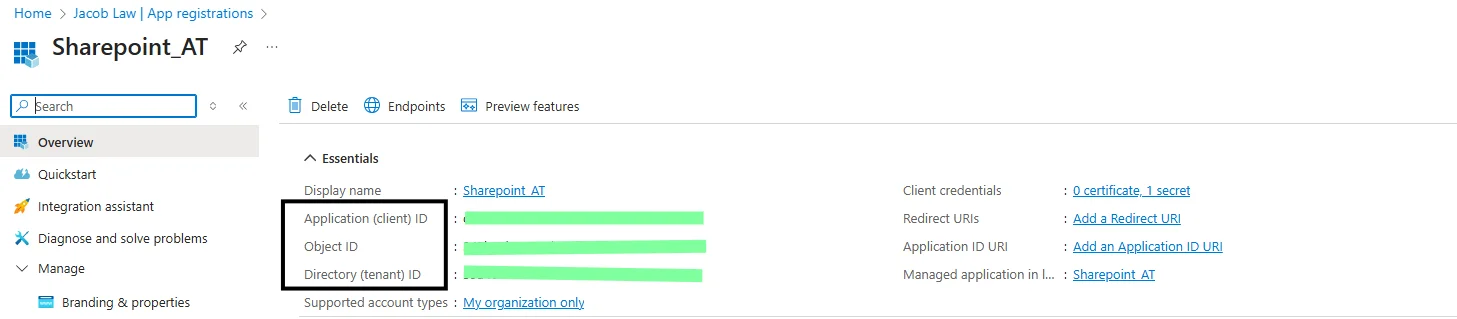
Assign Graph API Permissions
Now give the app the ability to talk to SharePoint:
Under the same app, go to API permissions → Add a permission
Select Microsoft Graph → Application permissions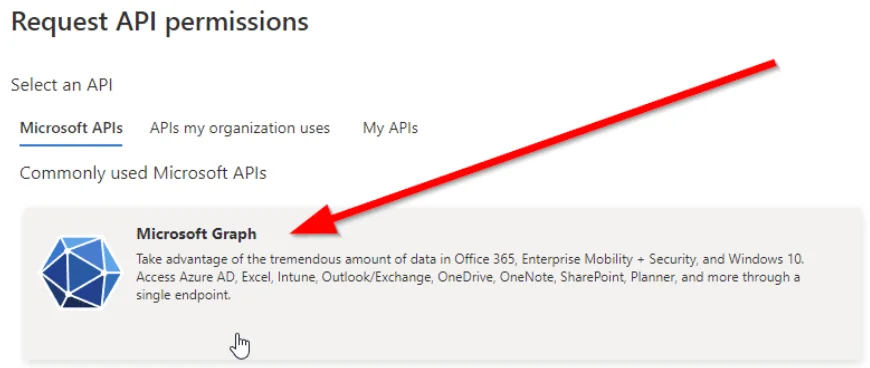
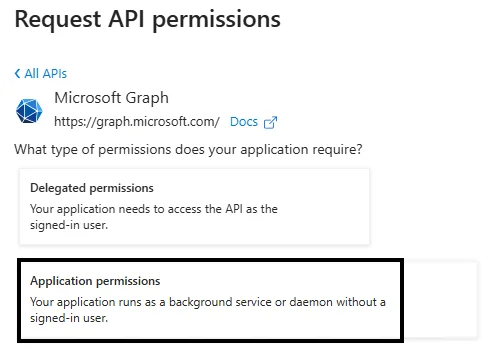
Search for Sites.ReadWrite.All and add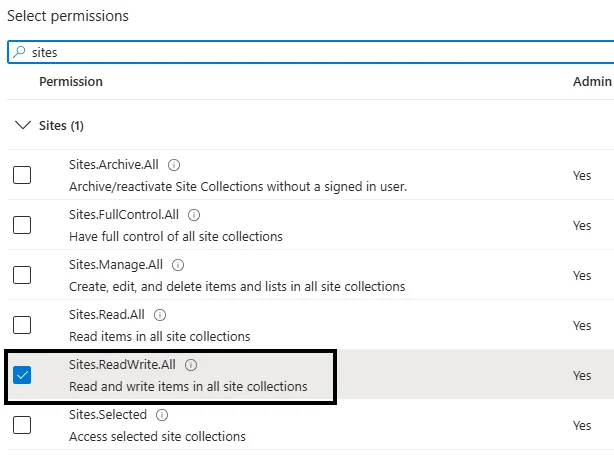
Click Grant admin consent for your org
This permission ensures the app has access only to SharePoint sites you explicitly grant access to, ensuring least-privilege security.
Permission for specific site
Now to only add permission on a specific SharePoint site, proceed as below:
1. Go to API permissions and click on Add a permission
2. Select SharePoint
3. Now, select Application permissions
6. Check Sites.Selected , Sites.FullControl.All and click on Add Permission
7. Click on Grant admin consent and done
Granting SharePoint Site Access via Graph Explorer
Once you’ve added the sites.selected graph api permission to your app registration, the app doesn’t automatically get access to any SharePoint sites. You need to explicitly grant access to the specific site you want to work with.
Here’s how to do it using Microsoft Graph Explorer, step-by-step
Step-by-Step: Grant write Access to a Specific SharePoint Site
{ “roles”: [“write”], “grantedToIdentities”: [{ “application”: { “id”: “azure app id”, “displayName”: “azure app displayname” } }] }
Boom, now all completed so we can use PowerShell script to Automate the file upload to SharePoint
Generate a Client Secret
If you want to use a secret proceed as below:
1. Go to Azure portal
2. Go to your Azure app which you created
3. Click on Certificates & secrets
4. Click on New client secret
5. Create your secret and save it securely
Upload content to SharePoint using GraphAPI PowerShell
To connect to your SharePoint site using the Azure AD application and upload files securely with Microsoft Graph API, you’ll need the following:
The SharePoint site URL (where the file will be uploaded)
The Azure app Client ID (from App Registration)
The Azure app secret (or certificate thumbprint if you’re using a cert-based auth)
The file path to the document you want to upload
Here’s the PowerShell script that makes it all work: This script works for uploading all the files which are under the folder. Also, The script will check if the files re already uploaded then it will skip it!
This is the main part: uploading a file using Graph API.
POWERSHELL • Upload-FilesToSharePoint.ps1
Next Steps in Production
This method is incredibly powerful and secure when you’re working across different tenants or automating data flows into SharePoint.
A few closing thoughts:
Rotate secrets regularly and use Azure Key Vault for storing secrets securely
You can easily convert this to use certificates instead of secrets for extra security
Always test with test data before touching production libraries
🛡️ Bonus Tip: Automate Microsoft Teams Recordings to SharePoint
If you’re using Microsoft Teams for meetings and recordings, one common problem is that those recordings expire or get deleted after a certain retention period. By combining Graph API with PowerShell or Logic Apps, you can automatically move or copy Teams recordings to a dedicated SharePoint document library.
This not only prevents accidental deletion but also ensures that all recordings are retained for compliance, training, or auditing purposes. If you’d like a step-by-step guide on that, let me know and I’ll publish a full blog soon!
Looking for an end-to-end practical implementation? Check out our complete playbook on Automating File Inventory Scanning and Uploading to SharePoint Using PowerShell and Intune.
If you want help building reusable modules or Logic Apps around this, connect with us on me a line on TechEuc.com or if you are facing any issues, you can comment or would need this implemented then you can check out my freelance profile too.
This method is incredibly powerful and secure when you’re working across different tenants or automating data flows into SharePoint.
A few closing thoughts:
Rotate secrets regularly and use Azure Key Vault for storing secrets securely
You can easily convert this to use certificates instead of secrets for extra security
Always test with test data before touching production libraries
Looking for an end-to-end practical implementation? Check out our complete playbook on Automating File Inventory Scanning and Uploading to SharePoint Using PowerShell and Intune.
If you want help building reusable modules or Logic Apps around this, connect with us on me a line on TechEuc.com
Atoofa Shaikh
Senior Microsoft 365, EUC & Cloud Endpoint Architect
Need custom Win32 App Packaging, PowerShell Automation, Zero-Touch Intune Autopilot, or SCCM Co-Management for your enterprise or MSP? I specialize in production-grade deployment architectures with zero downtime.
Table of content
Subscribe to Blog
Signup to our weekly newsletter
category
Connect with Us
Recommended Posts
Configure Windows Hello for Business in Intune (2026 Guide)
How to Configure Windows LAPS in Microsoft Intune: Complete Step-by-Step Guide
How to Fix Intune Error 0x87D1041C: App Not Detected After Installation [Complete Runbook]