Quick Answer: To automate file inventory scanning and upload reports to SharePoint using Intune, package a PowerShell script as a Win32 app or Proactive Remediation. The script scans target local directories (such as user profiles or ProgramData) using Get-ChildItem, outputs findings to a timestamped CSV, authenticates to Microsoft Graph API using an Azure Entra App Registration (certificate or client secret with Sites.Selected permissions), and uploads the report to a secure SharePoint document library.
As an IT admin or EUC engineer, you’ve probably been asked to identify specific files across hundreds of endpoints, whether it’s a license file, configuration file, or a particular executable. Doing that manually isn’t just inefficient it’s nearly impossible at scale.
That’s where automation comes in.
In this blog, we’ll build a PowerShell automation that does two things:
Scans your entire device for files matching a name or pattern and generates a detailed inventory report (CSV and JSON).
Automatically uploads the results to SharePoint using the Microsoft Graph API, making the reports accessible and centralized.
You can deploy this script using Microsoft Intune, allowing every managed device to report its findings back to your SharePoint site automatically.
Section 1: File Inventory Scanning with PowerShell
This section focuses on automating the discovery process: finding specific files (e.g., setup.exe, license.txt, config.json) across all drives and optionally in OneDrive folders.
Here’s what the script does:
Scans all local drives (C:, D:, etc.)
Optionally includes OneDrive folders
Accepts search patterns or a configuration JSON file
Exports results to CSV and JSON under C:\ProgramDataFileInventory
Captures metadata such as file name, path, version, owner, and timestamps
PowerShell file inventory scanner for Windows devices
This Script scans all local filesystem drives for files matching a configurable search string or list of patterns. The result is stored in CSV and JSON at C:\ProgramDataFileInventory location.
POWERSHELL • FileInventoryScanner.ps1
<#
.SYNOPSIS
    Client-side PowerShell file-inventory scanner for Windows devices.
.DESCRIPTION
    Scans all local filesystem drives for files matching a configurable search string or list of patterns.
    Optionally includes OneDrive for Business (per-user) locations.
    Outputs results to CSV and JSON, and writes a short log to the console.
    Supports configuration via a JSON file (C:\ProgramData\FileScanConfig.json) so you can update search criteria without changing the script deployed to clients.
.NOTES
    Usage: Deploy via Intune (PowerShell script) or run in SYSTEM/User context.
    Run using: powershell.exe -ExecutionPolicy Bypass -File "FileInventoryScanner.ps1" -SearchString "*google*"
#>

[CmdletBinding()]
param(
    [string]$SearchString = '',
    [string[]]$SearchPatterns = @(),
    [switch]$DisableOneDrive = $false,
    [string]$OutputFolder = "$env:ProgramData\FileInventory",
    [switch]$IncludeFileVersionInfo = $true,
    [switch]$VerboseLogging = $false
)

# Helper: Load config from JSON file if it exists
$ConfigPath = 'C:\ProgramData\FileScanConfig.json'
if (Test-Path -Path $ConfigPath) {
    try {
        $cfg = Get-Content -Path $ConfigPath -Raw | ConvertFrom-Json -ErrorAction Stop
        if ($null -ne $cfg.SearchString -and -not [string]::IsNullOrWhiteSpace($cfg.SearchString)) {
            $SearchString = $cfg.SearchString
        }
        if ($null -ne $cfg.SearchPatterns -and $cfg.SearchPatterns.Count -gt 0) {
            $SearchPatterns = $cfg.SearchPatterns
        }
        if ($cfg.DisableOneDrive -eq $true) {
            $DisableOneDrive = $true
        }
        if ($null -ne $cfg.OutputFolder -and -not [string]::IsNullOrWhiteSpace($cfg.OutputFolder)) {
            $OutputFolder = $cfg.OutputFolder
        }
    }
    catch {
        Write-Verbose "Failed to load config $ConfigPath : $_"
    }
}

# If user provided only a SearchString, build wildcard pattern
if (($SearchPatterns -eq $null) -or ($SearchPatterns.Count -eq 0)) {
    if (-not [string]::IsNullOrWhiteSpace($SearchString)) {
        $SearchPatterns = @("*$SearchString*")
    }
    else {
        Write-Host "No search string/pattern provided. Provide -SearchString or deploy a config file to $ConfigPath." -ForegroundColor Yellow
        exit 2
    }
}

# Ensure output folder exists
try {
    New-Item -Path $OutputFolder -ItemType Directory -Force | Out-Null
}
catch { }

$Hostname = $env:COMPUTERNAME
$Now = Get-Date -Format 'yyyyMMdd_HHmmss'
$CsvPath = Join-Path -Path $OutputFolder -ChildPath "FileInventory_${Hostname}_$Now.csv"
$JsonPath = Join-Path -Path $OutputFolder -ChildPath "FileInventory_${Hostname}_$Now.json"

# Build list of root paths to search (all file-system PSDrives)
$fsDrives = Get-PSDrive -PSProvider FileSystem | Where-Object { $_.Root -and (Test-Path -Path $_.Root) }
$rootPaths = @()
foreach ($d in $fsDrives) {
    $rootPaths += $d.Root
}

# Add OneDrive folders if not disabled and running in user context
$includeOneDrive = -not $DisableOneDrive
if ($includeOneDrive) {
    if ($env:USERNAME -and $env:USERNAME -ne 'SYSTEM') {
        $oneDriveCandidates = @(
            "$env:USERPROFILE\OneDrive",
            "$env:USERPROFILE\OneDrive - *",
            "$env:USERPROFILE\OneDrive - * - Personal"
        )
        foreach ($p in $oneDriveCandidates) {
            try {
                $resolved = Get-ChildItem -Path $p -Directory -ErrorAction SilentlyContinue | ForEach-Object { $_.FullName }
                if ($resolved) {
                    $rootPaths += $resolved
                }
            }
            catch { }
        }
    }
    else {
        Write-Verbose "OneDrive scan requested but running as SYSTEM or cannot access profile. Skipping OneDrive paths." -Verbose:$VerboseLogging
    }
}

# Deduplicate
$rootPaths = $rootPaths | Sort-Object -Unique
Write-Host "Scanning $($rootPaths.Count) root path(s) for patterns: $($SearchPatterns -join ', ')" -ForegroundColor Cyan

$results = [System.Collections.Generic.List[PSObject]]::new()

# Function to build result object
function New-ResultObject {
    param($fileInfo, $fileVersion)

    $owner = $null
    if ($null -ne $fileInfo.FullName) {
        try {
            $owner = (Get-Acl -LiteralPath $fileInfo.FullName -ErrorAction Stop).Owner
        }
        catch {
            $owner = $null
        }
    }

    [PSCustomObject]@{
        Hostname        = $Hostname
        FileName        = $fileInfo.Name
        FullName        = $fileInfo.FullName
        FilePath        = $fileInfo.DirectoryName
        SizeBytes       = $fileInfo.Length
        DateCreated     = $fileInfo.CreationTimeUtc.ToString('o')
        DateAccessed    = $fileInfo.LastAccessTimeUtc.ToString('o')
        DateModified    = $fileInfo.LastWriteTimeUtc.ToString('o')
        Owner           = $owner
        ProductName     = $fileVersion.ProductName
        ProductVersion  = $fileVersion.ProductVersion
        FileDescription = $fileVersion.FileDescription
        ScanTimestamp   = (Get-Date).ToString('o')
    }
}

# Start scanning
foreach ($root in $rootPaths) {
    foreach ($pattern in $SearchPatterns) {
        Write-Verbose "Searching root: $root pattern: $pattern" -Verbose:$VerboseLogging
        try {
            $files = Get-ChildItem -LiteralPath $root -Filter $pattern -File -Recurse -ErrorAction SilentlyContinue
        }
        catch {
            try {
                $files = Get-ChildItem -LiteralPath $root -File -Recurse -ErrorAction SilentlyContinue | Where-Object { $_.Name -like $pattern }
            }
            catch {
                Write-Verbose "Failed to enumerate $root : $_" -Verbose:$VerboseLogging
                continue
            }
        }

        foreach ($f in $files) {
            $fv = [PSCustomObject]@{
                ProductName     = $null
                ProductVersion  = $null
                FileDescription = $null
            }
            if ($IncludeFileVersionInfo) {
                try {
                    $vi = [System.Diagnostics.FileVersionInfo]::GetVersionInfo($f.FullName)
                    $fv.ProductName     = $vi.ProductName
                    $fv.ProductVersion  = $vi.ProductVersion
                    $fv.FileDescription = $vi.FileDescription
                }
                catch { }
            }
            $results.Add((New-ResultObject -fileInfo $f -fileVersion $fv))
        }
    }
}

# Write outputs
$resultsArray = $results.ToArray()
try {
    if ($resultsArray.Count -gt 0) {
        $resultsArray | Export-Csv -Path $CsvPath -NoTypeInformation -Force
        $resultsArray | ConvertTo-Json -Depth 5 | Out-File -FilePath $JsonPath -Encoding UTF8 -Force
        Write-Host "Found $($resultsArray.Count) matching file(s). CSV -> $CsvPath JSON -> $JsonPath" -ForegroundColor Green
    }
    else {
        Write-Host "No matching files found." -ForegroundColor Yellow
    }
}
catch {
    Write-Host "Failed to write output: $_" -ForegroundColor Red
}

# Audit log entry
$AuditFile = Join-Path -Path $OutputFolder -ChildPath "FileInventory_Audit.log"
$summary = "$(Get-Date -Format o) - Host:$Hostname - Patterns:$($SearchPatterns -join ',') - Results:$($resultsArray.Count) - OutputCSV:$CsvPath"
Add-Content -Path $AuditFile -Value $summary -ErrorAction SilentlyContinue

# Show sample in console
if ($resultsArray.Count -gt 0) {
    $resultsArray | Select-Object Hostname, FileName, FullName, ProductName, ProductVersion, FileDescription, FilePath, DateCreated, DateAccessed | Select-Object -First 20 | Format-Table -AutoSize
}

exit 0
Once the script is ran, it will create below files.
Section 2: Uploading the Report to SharePoint Automatically
Now that your scan results are generated, let’s automate their upload to SharePoint.
We’ll use Microsoft Graph API to securely authenticate (via App Registration) and upload the generated files to a SharePoint Document Library. This ensures all your file inventory reports are centralized and accessible for auditing or analysis.
Pre-requisites
Register an app in Azure AD with permissions ( Sites.FullControl.All, Sites.ReadWrite.All,Sites.Selected )
How to Deploy via Intune (Win32 App Method) or SCCM Package/Application
You can deploy this script from Intune as Win32 Application, Or if you need to deploy this as script, then you can specify the search string inside the script directly.
If you are using SCCM, then you can create this as Package model and the install command you can set as powershell -ep bypass -file “ScriptName.ps1” “*google*”
This script also search multiple patterns where you can pass the arguments like below
Scan its local storage for your defined file patterns
Generate CSV and JSON reports
Upload them to SharePoint using Graph API
You’ll now have a centralized dashboard of file inventories, directly accessible through your SharePoint library.
Next Steps in Production
Automating file discovery and report uploads saves hours of manual effort and eliminates human error. By combining PowerShell, Intune, and Microsoft Graph, we’ve turned what used to be a tedious IT task into a fully autonomous workflow.
This approach scales across your entire organization and provides real-time visibility into your environment. Whether it’s for compliance, audits, or vulnerability checks. you now have a single automated solution doing the heavy lifting.
FIVERR PRO VERIFIED12+ YRS EXPERIENCE
Atoofa Shaikh
Senior Microsoft 365, EUC & Cloud Endpoint Architect
Need custom Win32 App Packaging, PowerShell Automation, Zero-Touch Intune Autopilot, or SCCM Co-Management for your enterprise or MSP? I specialize in production-grade deployment architectures with zero downtime.

Automate File Inventory Scanning and Uploading to SharePoint using PowerShell and Intune
Table of content
Quick Answer: To automate file inventory scanning and upload reports to SharePoint using Intune, package a PowerShell script as a Win32 app or Proactive Remediation. The script scans target local directories (such as user profiles or ProgramData) using
Get-ChildItem, outputs findings to a timestamped CSV, authenticates to Microsoft Graph API using an Azure Entra App Registration (certificate or client secret withSites.Selectedpermissions), and uploads the report to a secure SharePoint document library.As an IT admin or EUC engineer, you’ve probably been asked to identify specific files across hundreds of endpoints, whether it’s a license file, configuration file, or a particular executable. Doing that manually isn’t just inefficient it’s nearly impossible at scale.
That’s where automation comes in.
In this blog, we’ll build a PowerShell automation that does two things:
Scans your entire device for files matching a name or pattern and generates a detailed inventory report (CSV and JSON).
Automatically uploads the results to SharePoint using the Microsoft Graph API, making the reports accessible and centralized.
You can deploy this script using Microsoft Intune, allowing every managed device to report its findings back to your SharePoint site automatically.
Section 1: File Inventory Scanning with PowerShell
This section focuses on automating the discovery process: finding specific files (e.g., setup.exe, license.txt, config.json) across all drives and optionally in OneDrive folders.
Here’s what the script does:
PowerShell file inventory scanner for Windows devices
This Script scans all local filesystem drives for files matching a configurable search string or list of patterns. The result is stored in CSV and JSON at C:\ProgramDataFileInventory location.
POWERSHELL • FileInventoryScanner.ps1
Once the script is ran, it will create below files.
Section 2: Uploading the Report to SharePoint Automatically
Now that your scan results are generated, let’s automate their upload to SharePoint.
We’ll use Microsoft Graph API to securely authenticate (via App Registration) and upload the generated files to a SharePoint Document Library. This ensures all your file inventory reports are centralized and accessible for auditing or analysis.
Pre-requisites
Register an app in Azure AD with permissions ( Sites.FullControl.All, Sites.ReadWrite.All,Sites.Selected )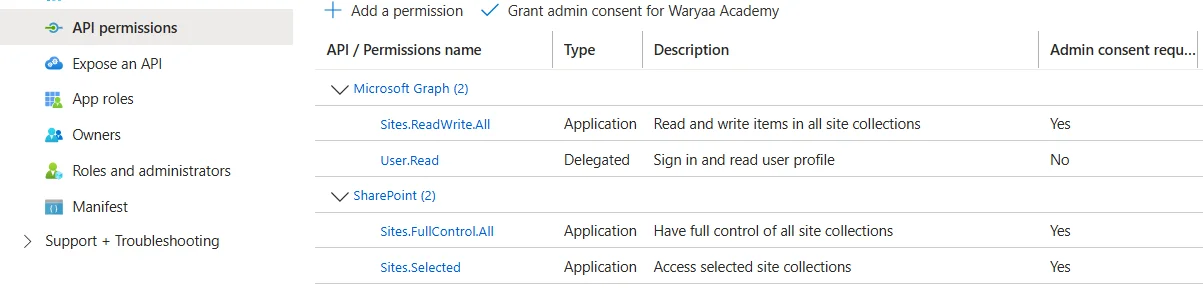
Generate a Client Secret and note your: Tenant ID, Client ID and Client Secret. You can refer to blog for setting up API permission and App from blog How to Upload Files to SharePoint Online Using Microsoft Graph API and PowerShell – Tech EUC
Identify your SharePoint Site ID and Document Library (Drive) ID
Here is your full script which will scan the windows files based on names and then automatically upload the results to SharePoint.
POWERSHELL • Upload-FileInventoryToSharePoint.ps1
How to Deploy via Intune (Win32 App Method) or SCCM Package/Application
You can deploy this script from Intune as Win32 Application, Or if you need to deploy this as script, then you can specify the search string inside the script directly.
If you are using SCCM, then you can create this as Package model and the install command you can set as
powershell -ep bypass -file “ScriptName.ps1” “*google*”
This script also search multiple patterns where you can pass the arguments like below
powershell -ep bypass -file “ScriptName.ps1” “*google*”, “*zoom*”
Result
Once deployed, each endpoint will:
Scan its local storage for your defined file patterns
Generate CSV and JSON reports
Upload them to SharePoint using Graph API
You’ll now have a centralized dashboard of file inventories, directly accessible through your SharePoint library.
Next Steps in Production
Automating file discovery and report uploads saves hours of manual effort and eliminates human error. By combining PowerShell, Intune, and Microsoft Graph, we’ve turned what used to be a tedious IT task into a fully autonomous workflow.
This approach scales across your entire organization and provides real-time visibility into your environment. Whether it’s for compliance, audits, or vulnerability checks. you now have a single automated solution doing the heavy lifting.
Atoofa Shaikh
Senior Microsoft 365, EUC & Cloud Endpoint Architect
Need custom Win32 App Packaging, PowerShell Automation, Zero-Touch Intune Autopilot, or SCCM Co-Management for your enterprise or MSP? I specialize in production-grade deployment architectures with zero downtime.
Table of content
Subscribe to Blog
Signup to our weekly newsletter
category
Connect with Us
Recommended Posts
Configure Windows Hello for Business in Intune (2026 Guide)
How to Configure Windows LAPS in Microsoft Intune: Complete Step-by-Step Guide
How to Fix Intune Error 0x87D1041C: App Not Detected After Installation [Complete Runbook]